Self-fulfillment allows you to print or outsource orders yourself rather than using one of our 5 integrated Print Vendors. Once you receive an order, you are responsible for printing and shipping.
PhotoShelter assesses a transaction fee on self-fulfilled items at the point of sale. The fee is due on your next month's bill, whether or not you've marked the order as fulfilled.
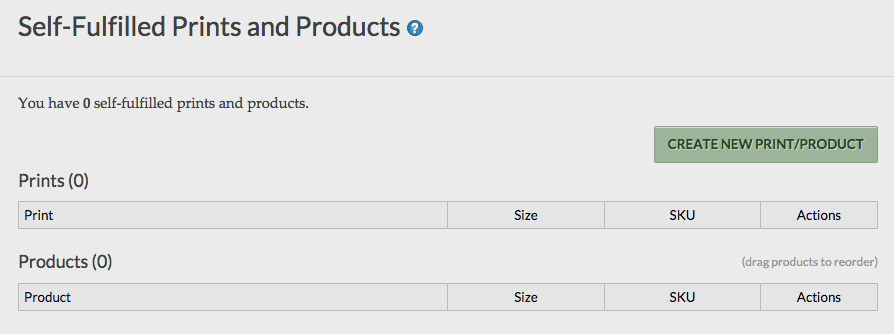
Setting Up Self-Fulfilled Prints & Products
1. Select Sell > Self-Fulfillment
2. Click the Create New Print/Product button to add a new item. If you plan to have a print lab fulfill the item (rather than print the orders yourself), we encourage you to check with this lab to see the range of sizes and products they have available.
3. On the Create Self-Fulfilled Product page under 1. Describe your item, fill out the Product Name (which will be displayed to buyers) and select the Item Type (either a Print or Product). You can optionally set a SKU (a reference number some photographers use for inventory purposes), which is only visible to you. You can also add a product description, estimated production times, and sample product image, all of which will be displayed to buyers when shopping.
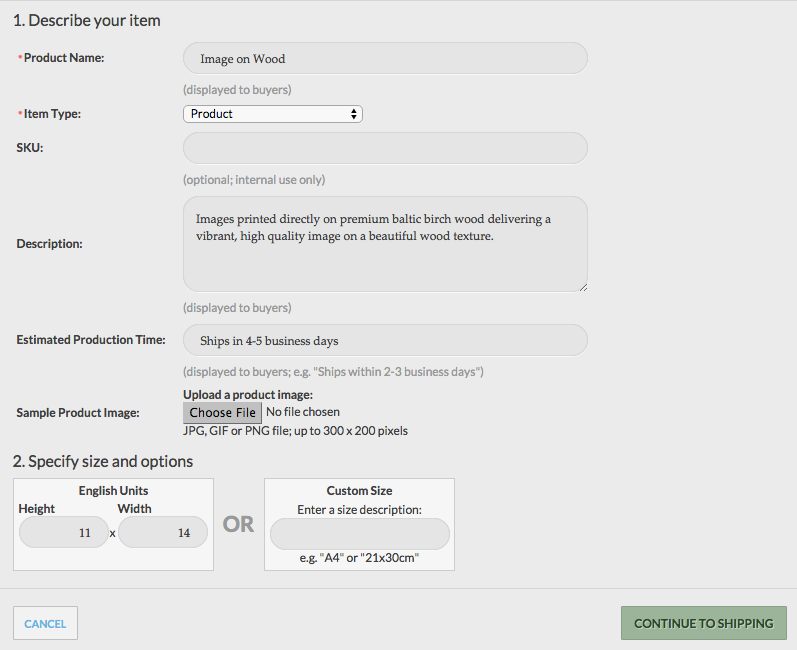
4. Next, look to 2. Specify size and options, where you must specify either height and width (English units only - i.e. inches) or a custom size. The print size is for your internal use only and is not displayed to buyers, so you should clearly indicate size in the Product Name (e.g. "8x10 Signed Print" or "20x30cm Print") so buyers are informed of their options when shopping.
Custom size descriptions can be up to 20 characters long. This is useful if you prefer metric or special sizes (e.g. "A4" or "30x20cm"). Please note if the custom size field is used, the buyer will not be able to select his or her own crop when checking out. If you are creating a self-fulfilled item defined as a product (as opposed to a print), you may opt to define the image's dimensions, but it's not required in this case.
Although height and width are not required if you specify a custom size, they are useful for ensuring proper sorting of the options. For instance, if you are offering an "A4" self-fulfill print in addition to standard EZ Prints sizes, entering the correct dimensions for your print in inches (in this case, 8.3 x 11.7) will place your print after "8x10" prints, but before "11x14" prints.
5. Lastly on this page, indicate your print or product's finish options, which will be displayed to the buyer. These include:
- Matte
- Glossy
- Lustre
- Metallic
- Art
- Stretched Canvas
- Watercolor
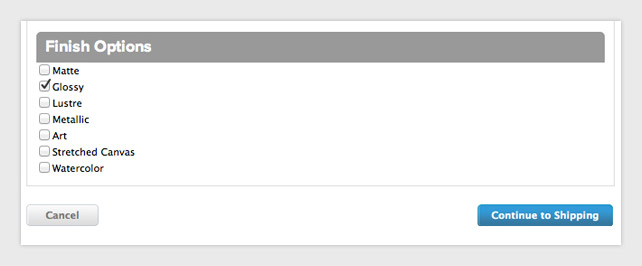
6. When you've made your selections, click the "Continue to Shipping" button.
7. The second part of the process is to define the shipping options. Because your self-fulfilled products can vary in size and weight, we give you the ability to create shipping options and destinations. If you're unsure of what to charge for shipping, we highly recommend contacting the print lab you plan to use to fulfill orders and see how they've set up their shipping options.
Under 3. Set your shipping options, you must fill out the following fields:
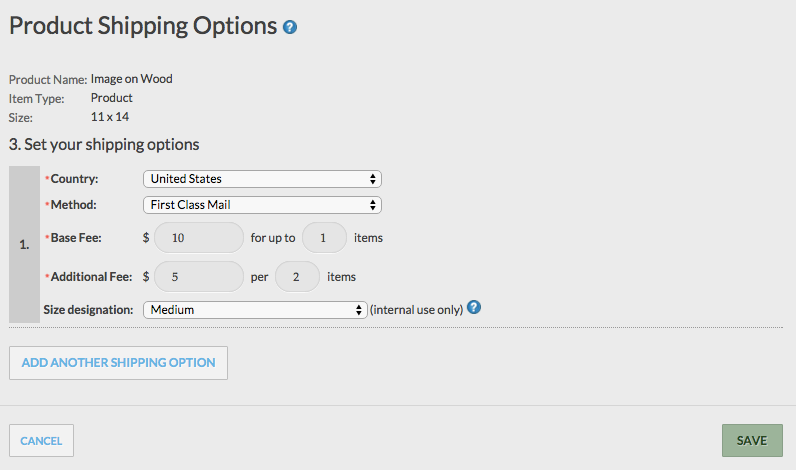 Country: You may create a separate shipping entry for each country you want to support, or you can choose [All other countries] to charge the same rate for all countries other than those you specifically indicate (works if you have more than one shipping option).
Method: Shipping vendors (e.g. FedEx) are listed, as well as more generic options, such as 2-day air.
Base Fee: The base fee is the initial fee for shipping the item. You can specify the fee for one item or for multiple items. For example, if the item is a signed 8x10 inch print, then you might allow buyers to purchase up to 10 prints with the base fee. But if the item is a book, you might only include one item given its heavier weight and thus greater shipping costs.
Additional Fees: If you want to charge a fee for shipping additional items (i.e. items over what's included in your base fee), you can do so here. For example, an extra $5.00 for every 10 items after what's included with the base fee.
Size Designation: This is an optional field to group shipping of items that all have the size you select. For example, if you have a book with a shipping price of $10 for two items and a size designation of "small," and a framed print with a shipping price of $15 for two items and a size designation of "small" - a customer who orders both will have the shipping grouped because the size designation is the same. They will pay the higher of the two fees.
8. If you'd like, click the Add Another Shipping Option button to add more options. Otherwise, click the Save button when you've finalized your choices.
9. Now that you're back on the Self-Fulfilled Prints and Products page, you can change the order in which they will display to buyers. You may choose to alter this sequence by dragging and dropping the products within the list - that way they appear on this page in the order in which they will be displayed on your website.
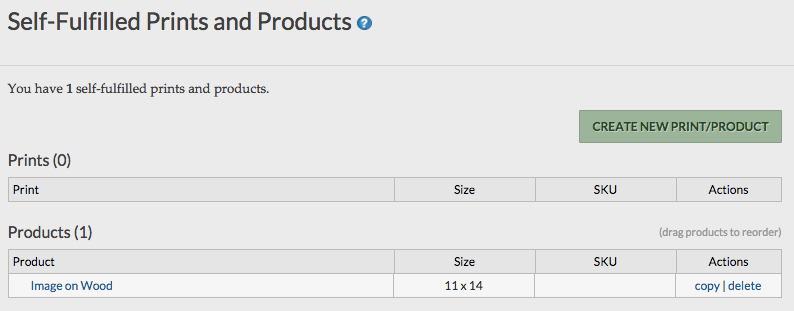
10. If you ever want to create a similar self-fulfilled print or product, you can click the copy link under the Actions column. Or if you want to delete a print or product offer, click the delete link.
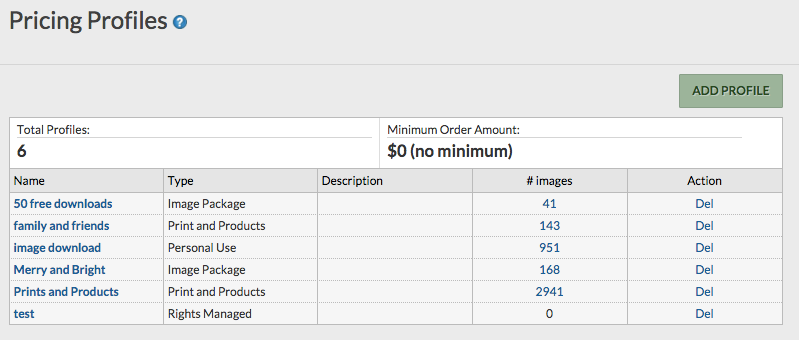
11. Once you've created your self-fulfillment products, you need to create a Pricing Profile. Select Sell > Pricing Profiles from the Navigation Bar, and either click the blue Add Profile button to create a new Pricing Profile or click one of your existing Prints and Products profiles.
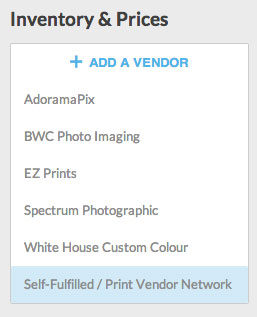
12. In the Inventory & Prices section, click the + Add a Vendor button and select Self-Fulfilled / Print Vendor Network.
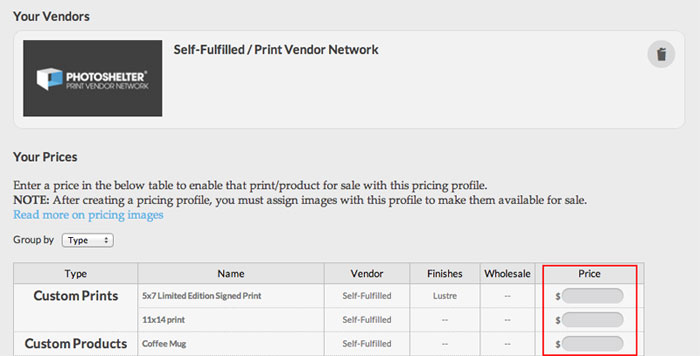
13. All of the self-fulfillment items you've created will appear, ready to be added to your Pricing Profile. In the blank Price fields provided next to each print/product name, enter the price at which you'd like to offer that particular print/product (leave the field blank if you do not want to offer a particular option here). Be sure to click the Save Pricing Profile button at the bottom of the page when you’re finished setting your prices.
Use the "Group by" drop-down to sort self-fulfillment prints/products as desired (by type, size, or no sort).
Selling Self-Fulfilled Prints & Products
You've set up and priced all your self-fulfilled prints and products -- what's next? And what happens after a purchase is made? Find out below.
1. Now that you have created or updated a Pricing Profile, you need to apply it to your galleries or images that you want to make available for this particular self-fulfilled item. Check out our detailed Applying Pricing Profiles tutorial to learn more.
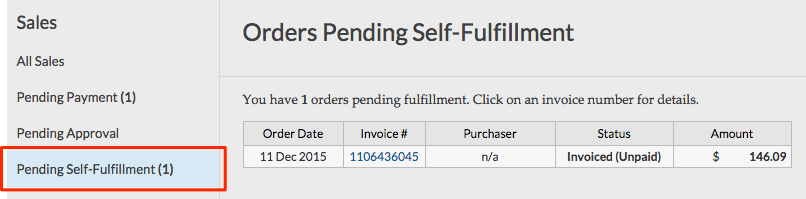
2. When someone purchases a self-fulfilled item, you will be notified via email. The order will also appear in Sell > My Sales under Pending Self-Fulfillment with a status of Pending Fulfillment.
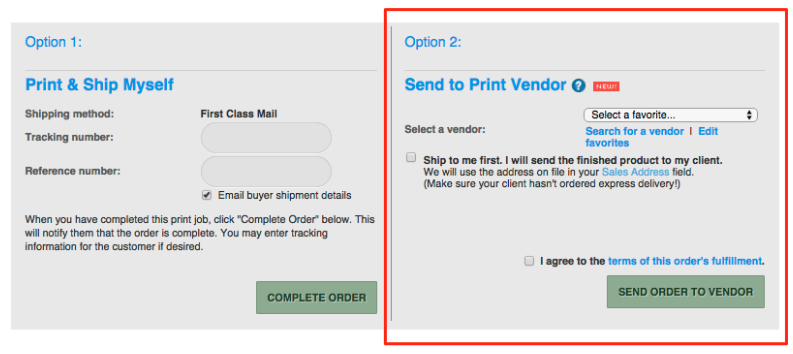
3. If you're fulfilling your print or product on your own, you can close it out by clicking on the invoice number, then clicking the Complete Order button at the bottom of the page. By default, this sends the buyer a shipment notification by email, but you can disable this by unchecking the Email buyer shipment details box. You can also choose to include a tracking number and/or other internal reference number.
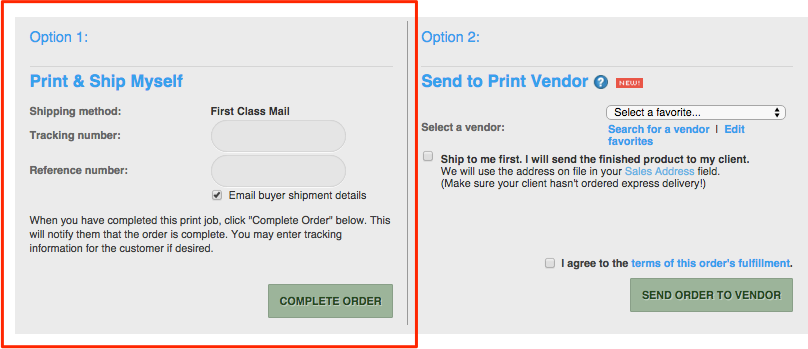
Alternatively, you can forward your order to any lab in the Print Vendor Network, at which point the fulfillment is placed in the hands of the selected vendor. For more on sending self-fulfilled orders to a lab from the Print Vendor Network, check out our detailed Print Vendor Network tutorial.
Still have questions? Contact us.